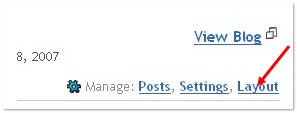
1.Sign in to your blogger dashboard>click the 'design' button[it used to be the 'layout' button]

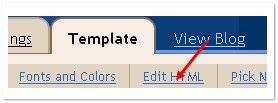
2.Click on the 'Edit html' tab

3. Then, check the "expand widgets" box
Here is the code you have to add
<meta content='DESCRIPTION HERE' name='description'/>

<meta content='KEYWORDS HERE' name='keywords'/>

<meta content='AUTHOR NAME HERE' name='author'/>
DESCRIPTION HERE:Write your blog description
KEYWORDS:Write the keywords of your blog
AUTHOR NAME:Write the author's name(Your name)
{ UPDATE : }
Now..You don't need to do it manually.. I created an automatic Meta Tags Generator to make this process easy for you!
Just go to this page and Enter some basic information like keywords,description,etc.. It will automatically generate you error free, effective Meta tags. Once done, copy that code and follow the next step.
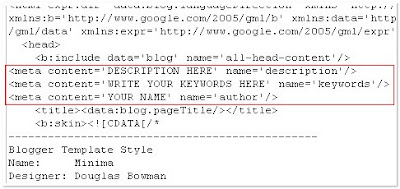
4.Add the above code just after this [Look at the below screenshot]
<b:include data='blog' name='all-head-content'/>
Don't forget to add description, keywords, and your name
and save the changes.
5. A quick way to check to see if you added the meta tags properly is to preview or view your blog. As long as the blog appears the same as it did before you added the tags, then you have done a great job! If there are errors, you want to go back to your to Design, Edit HTML, and Expand Widgets and check where you added the meta tags to make sure all of the keywords (except the last one) have a commas and spaces behind them.
IMPORTANT:
Several people were filling with just the keywords in the description.DON'T DO THAT.Google and other search engines will ban your site from the search engines list if you did so.And also,don't repeat the keyword more than 3 times.
That's it!You have sucessfully added the metatags to your blogger(blogpsot) blog.If you want to check whether you added the meta tags correctly or not,just type 'meta tags analyzer tool' in the google and you will find so many sites which can check whether you have added the tags correctly or not.